Coding with Color: Paint Apps
Written by Ace | July 23rd, 2021 | Technology and Art
JavaScript can be used to create some very cool programs, from animated robots, to games, to stunning flat art landscapes (or even 3D art!). The key is to know how to use JavaScript (JS) functions in the right combination to get what you want.
Often, the most attractive and fun programs are the most complex as well. But there’s one type of interactive JS program that you can easily code even if you don’t have the experience (or patience) to write hundreds of lines of code. These are the ‘paint apps.’ They’re not actually apps, but you might feel like they are when you use them.
Leveraging some basic functions, you can easily code your own paint app. And the best part is that paint apps are extremely versatile. You can draw pictures for you to color in, or you could change the brush from the usual circle to more complex things, like rectangles, triangles, pictures, or even your own custom-coded icons or pictures. You could also incorporate paint app code into a more complex program to make things like color books or ‘apps’ in which the user can change his or her brush stroke, color, or style. Really, the possibilities are endless.
But let’s say that you’re a complete beginner and you have no coding experience. How do you go about creating a paint app, even if it’s a simple one?
Read on to find out.
First: Get Familiar with Some JS Functions and Values
To code your own paint app, even a basic one, you first need to get familiar with some basic JS functions. These are the most common ones you’ll use for a basic paint app.
ellipse
This function draws an ellipse (either circle or oval, depending on your parameters).
Syntax: ellipse(x, y, w, h);
This function takes in four inputs:
- x—this is the x-coordinate of the ellipse, or, in other words, the horizontal distance (in pixels) from the left border of the canvas
- y—this is the y-coordinate of the ellipse, or, in other words, the vertical distance (in pixels) from the top border of the canvas
- w—this specifies the width of the ellipse in pixels
- h—this specifies the height of the ellipse in pixels
If you’d like a circle, set w and h to the same pixel value.
noStroke
This function removes the outline on shapes.
Syntax: noStroke();
This function is used to remove any outline on any shape that comes below it. Nothing goes in parentheses. Make sure that when you’re using this, you DON’T capitalize the n of “no” and you DO capitalize the s of “stroke.”
fill
This function colors in a shape or text to the specified color.
Syntax: fill(r, g, b);
The fill function takes a color input in rgb format, which means you specify a number from 0 through 255 for the amount of red (r), green (g), and blue (b). A black fill is specified as fill(0, 0, 0); and a white fill is specified as fill(255, 255, 255);
If you’re unsure about a specific color’s rgb value, or if you have another color type (like HEX) that you’d like to convert to rgb, you can check a search engine for the color’s rgb.
You can also always use Khan Academy’s built-in color picker, which comes with all JS functions that involve color. However, note that other code editors may not have color pickers.
draw
This function is used to animate projects.
Syntax:
draw = function(){
//Code goes in here
};
The draw function is ubiquitous in animation programming. Any code that goes inside it will be animated according to any specifications. You can learn more about this function’s role in animations from a previous post, “The Art of Animation.”
if
This function (referred to as an “if statement”) is used to execute certain code if certain conditions are met.
Syntax:
if(//a certain condition is true){
//Code goes in here; executed if condition is true
}
These statements are used a lot, and unlike many JS functions or commands, they don’t have a semicolon at the end (after the last curly brace). Write out the condition that must be valid in between parentheses, and the code that will be run if the condition is valid between the curly braces.
mouseIsPressed
This is a condition that checks if a user is pressing their mouse on the canvas. It doesn’t have any syntax because it’s not a function. It can, however, be passed as the condition in an if statement (that is, placed between the parentheses). You’ll see how we use this when we code our program.
mouseX and mouseY
These are values that track the x- and y-coordinates of a user’s mouse as it moves across the canvas. The browser tracks mouse movements on the canvas automatically and stores them in these variables. If you’re using them inside a draw function, the browser will track mouse movement and update the value of these variables real time; if you’re not using a draw function, the variables will be updated upon page load and won’t be updated again until the page is reloaded.
They’re not functions, so they don’t have a syntax. Rather, they’re considered values and can be used as inputs for function parameters, so use them the way you usually use numbers or variable names—you’ll see this in just a bit.
Just make sure that when you’re typing these, you capitalize the X and Y at the end, but not the m of “mouse.”
Let’s Paint!
Alright! Now that you know some of the basic functions you’ll need for your painting app, let’s code it!
I’ll be using the Khan Academy JS code editor, accessible here: https://www.khanacademy.org/computer-programming/new/pjs
We can divide the coding process into 3 steps.
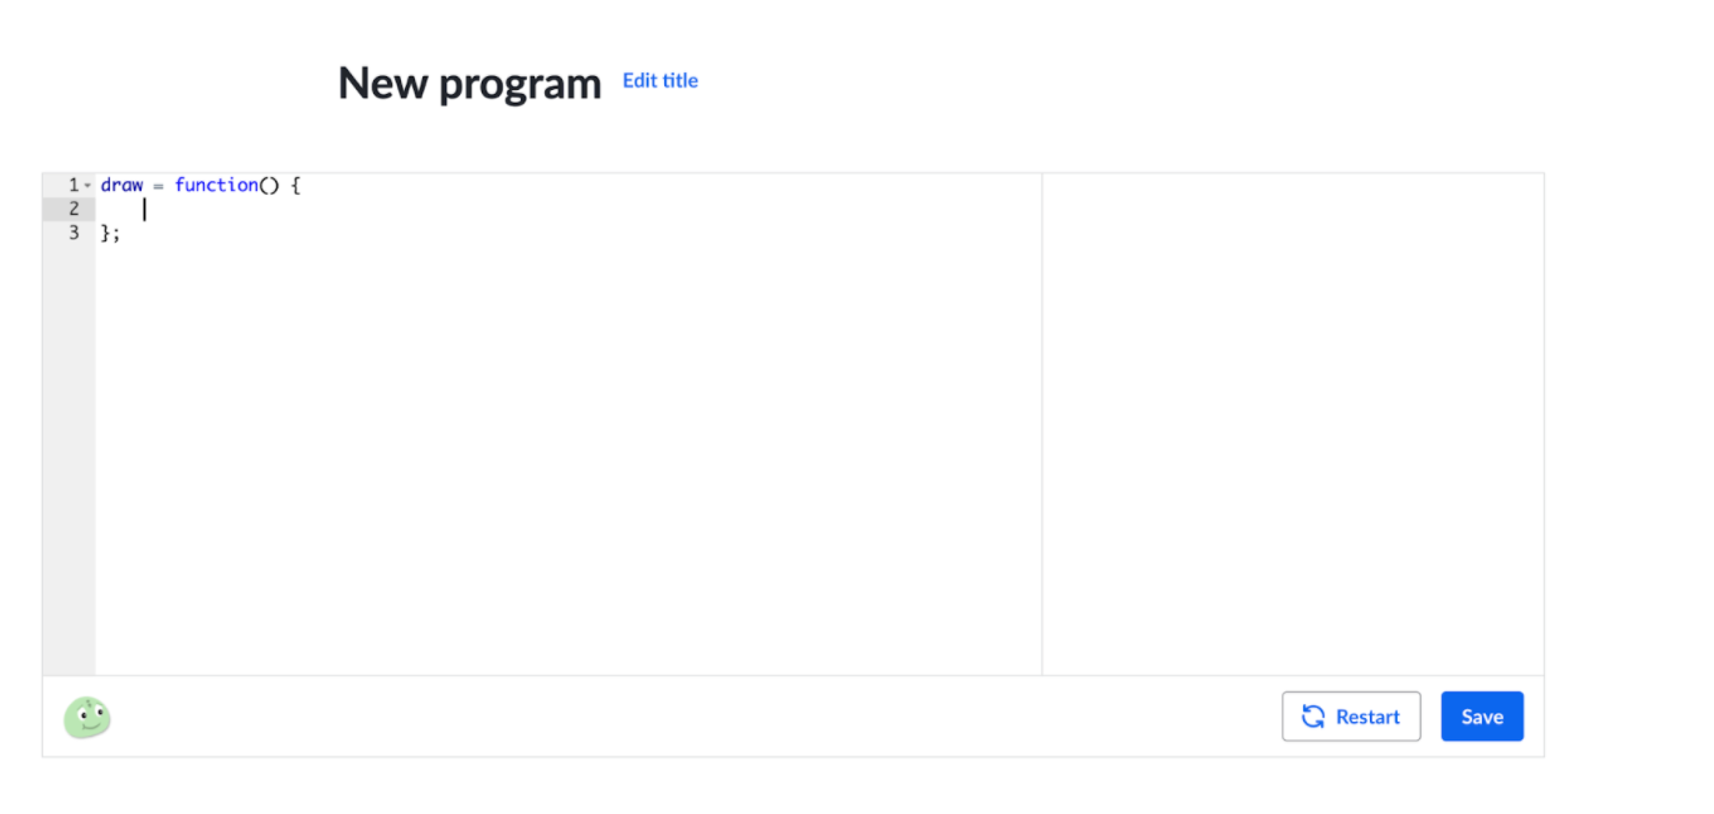
Step 1: draw Function
Add a draw function to the editor.
Step 2: Add the Logic
This step involves writing an if statement to check if the user is pressing their mouse on the canvas. If they are, we want them to be able to paint; but if they aren’t, then we don’t want any shape to show up.
This is how we set it up:
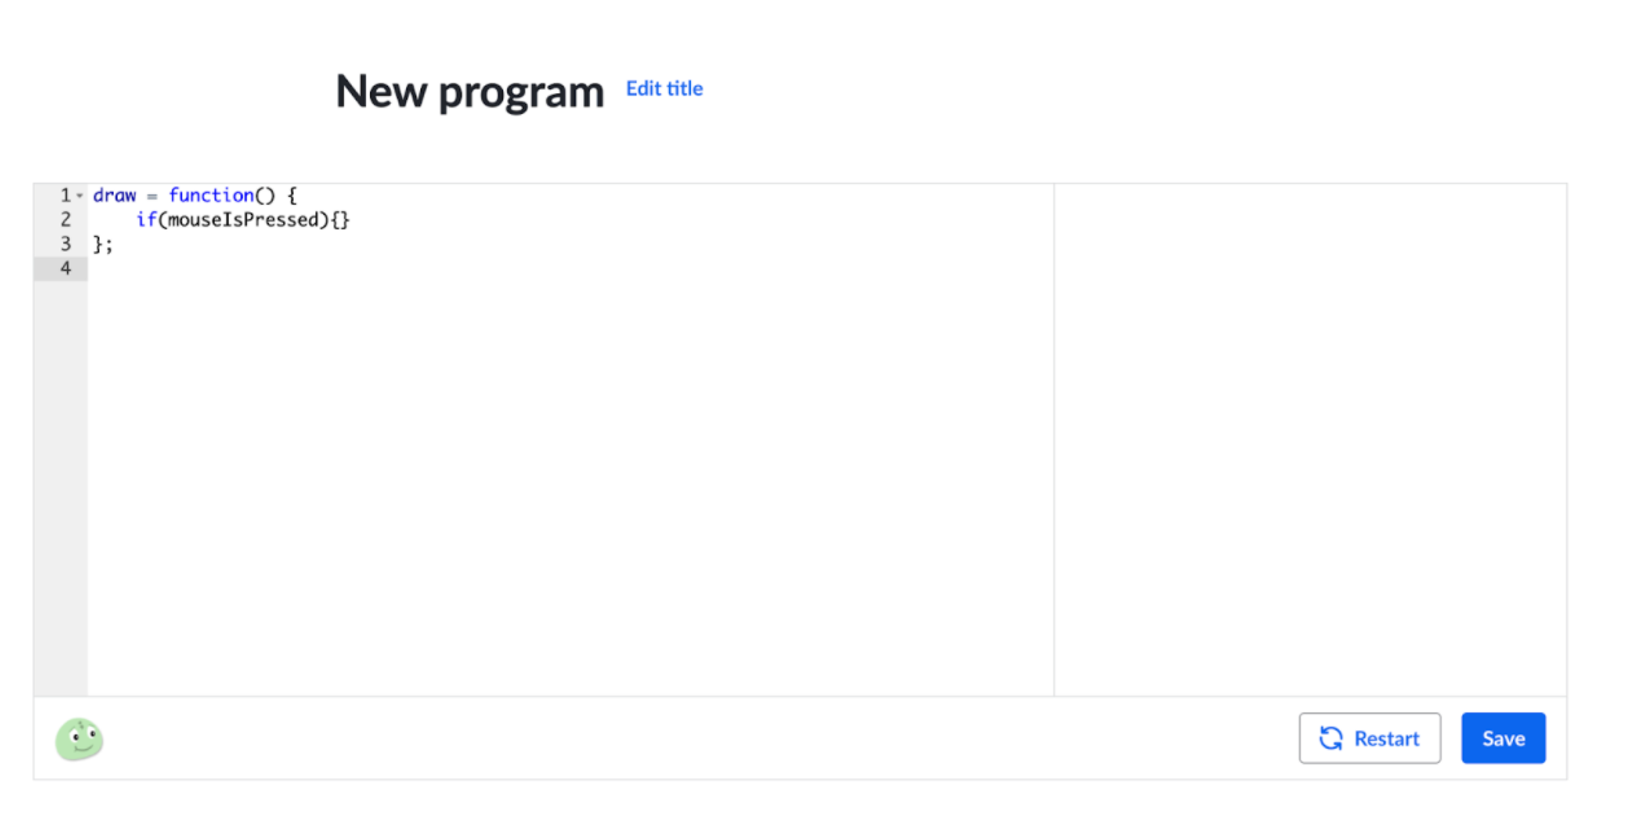
Notice how “mouseIsPressed” goes in between the parentheses of the if statement, and so far we have nothing in between the curly braces.
We’re going to add code in the curly braces in our next and final step.
Step 3: Draw the “Brush”
We will now draw a circle that will serve as the ‘brush’ of our paint app. We’ll use
- ellipse
- noStroke
- fill
- mouseX, mouseY
to draw the brush.
First, we’ll draw the shape itself, the ellipse. We’ll set the x-coordinate to be mouseX and the y-coordinate to be mouseY. The width and height should be the same because we’re drawing a circle. We’ll make both 25 (px) so that the paint brush isn’t too big but we can still see it.
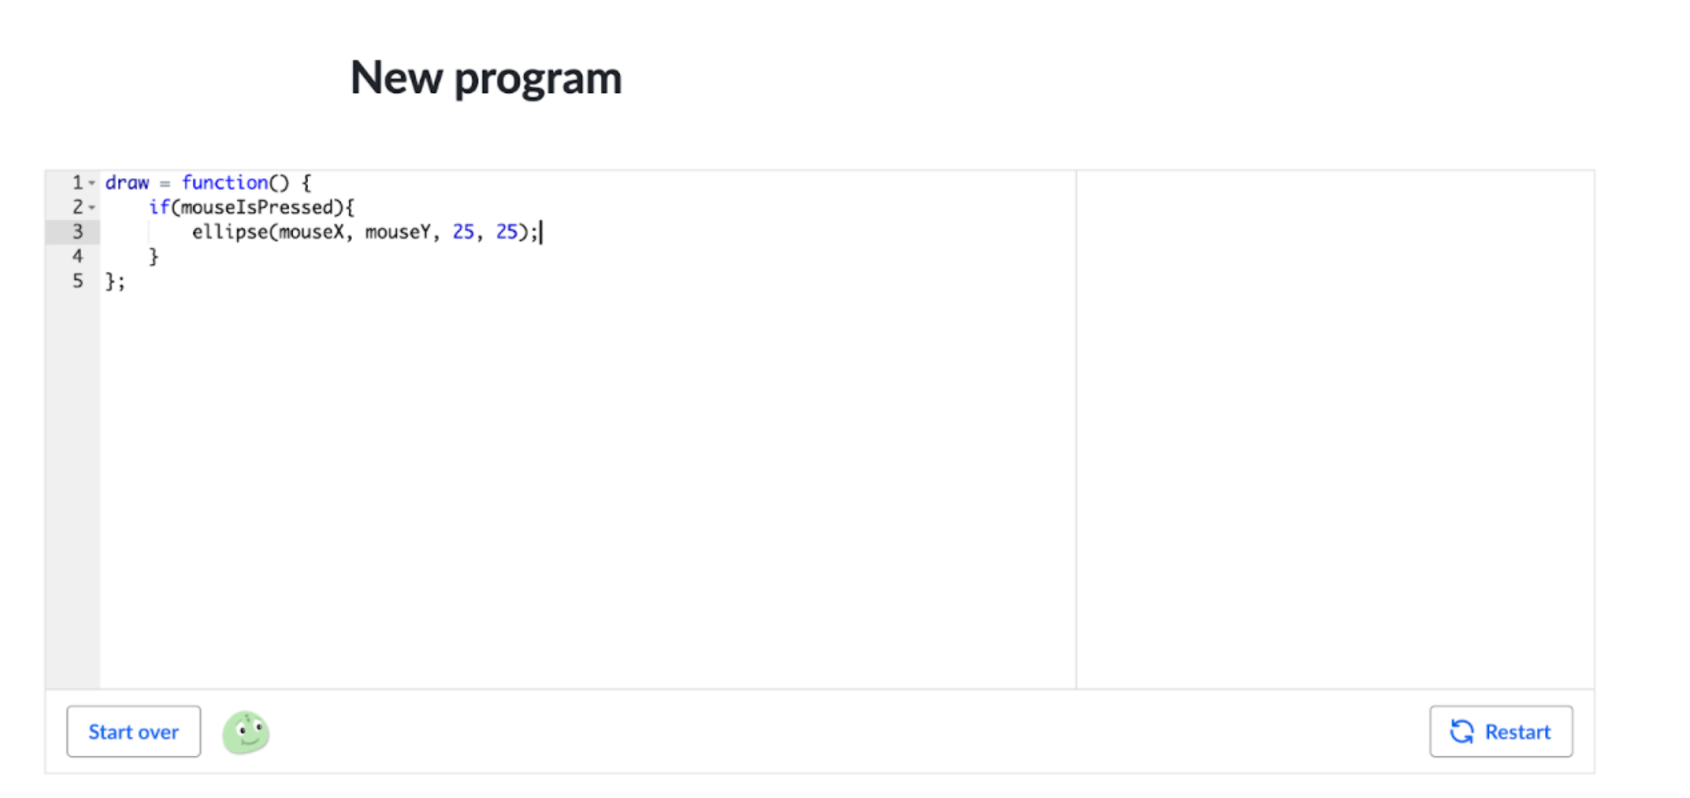
Next, we’ll want to add the styles to the ellipse command. We should do that before the ellipse command statement, but still inside the if statement, so that the styles are applied to the ellipse.
First, we’ll remove the stroke (outline) with the noStroke command:
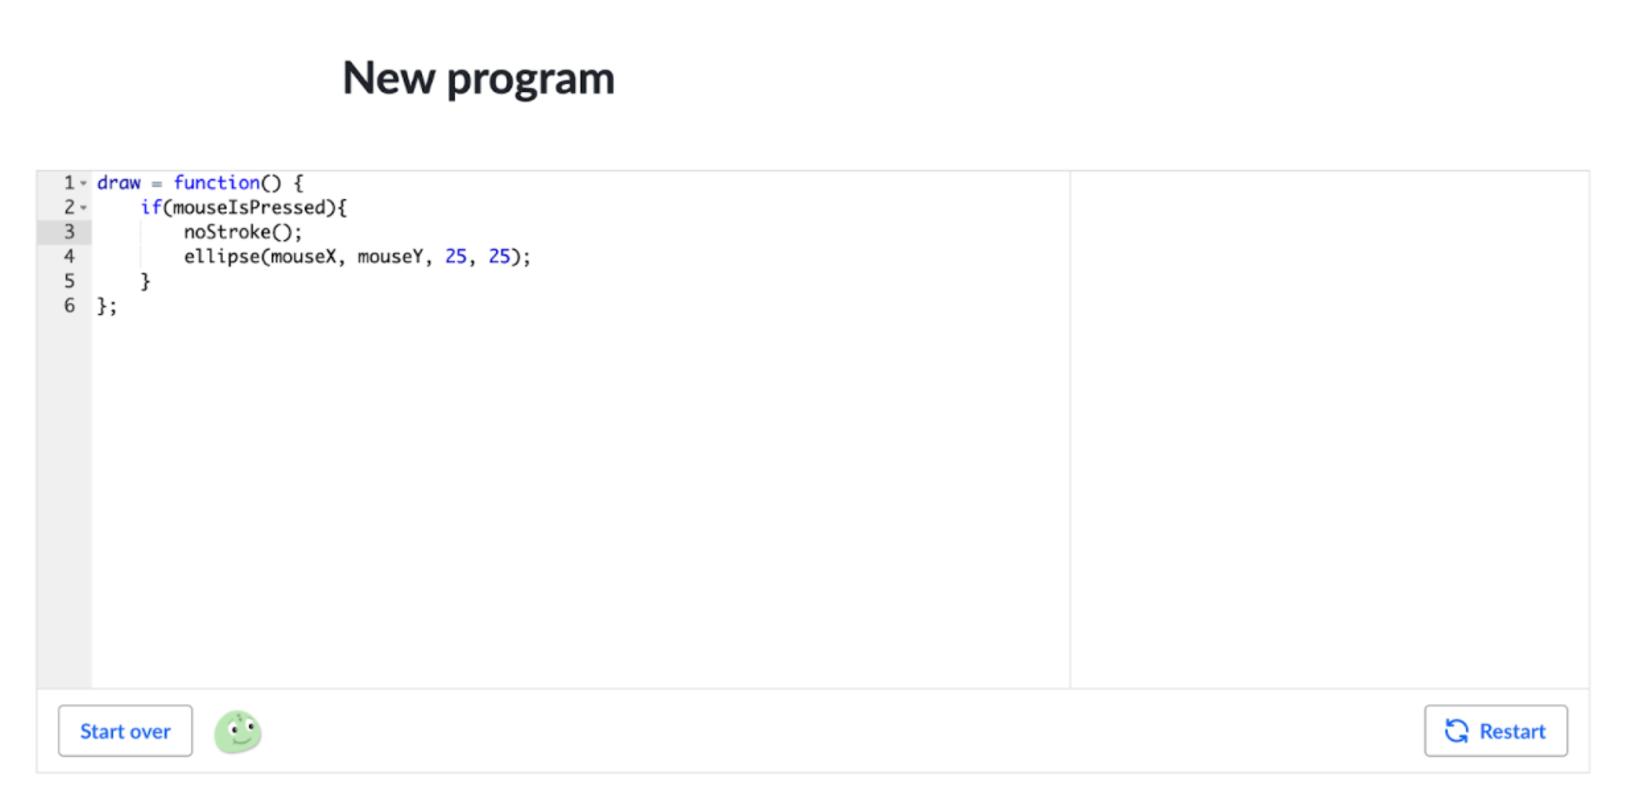
Then, we’ll add a fill command to change the color of the circle. We can set it to red just as an example, which has an rgb code of (255, 0, 0):
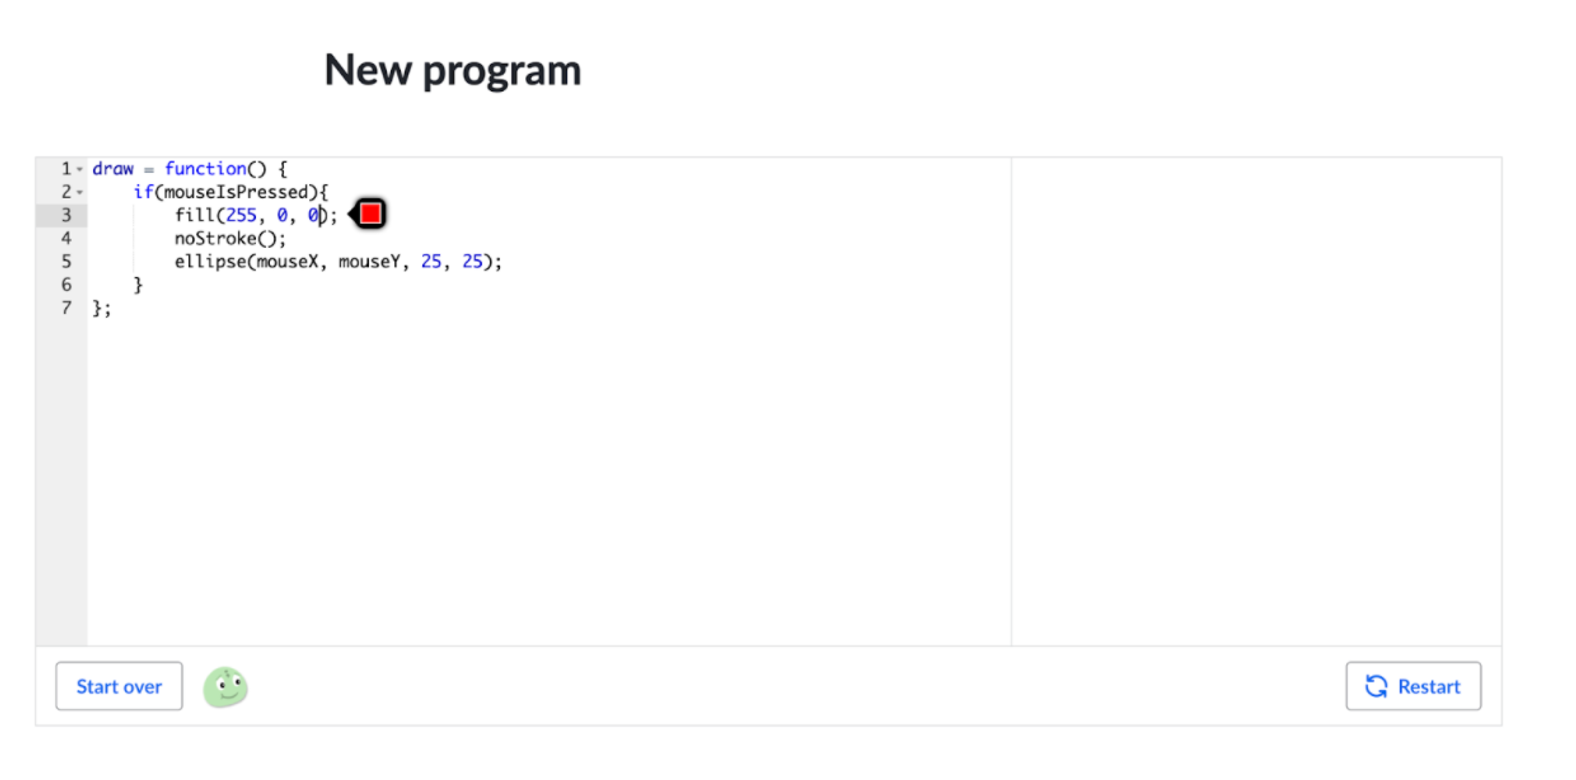
And… we’re done! We’ve completed our basic paint app.
Here’s a video that shows all those steps and a demo of our paint app.
Make the Paint App Your Own
The paint app we have now is very basic, but there are so many ways you can customize the paint app to be whatever you like!
You could change the color, for instance. You could try some interesting combinations for r, g, and b—for example, you could make the values of r, g, and b dependent on mouse position if you want!
You could also change the brush shape or size.
You could make the brush an image.
And so much more! Have fun creating your paint app, and if you have some more advanced JS knowledge (if you know, for instance, how to create custom functions), you can create some really cool projects.
Happy programming!
New to Pearson Online Academy? Learn More Here.
